High Tide Flooding
Data Limitations
The tide-gauge network is sparse, so there is a lack of tide data for many coastal communities and inconsistent periods of record for locations with gauges. Tide gauges are often placed in harbors and locations with protective housing that can reduce wave effects, preventing measurements of higher-frequency wave effects (Sweet et al. 2022). There is not a long-term record in many areas, and models that increase data coverage often underestimate water levels in areas with frequent tropical storms (Muis et al. 2016).
Definition and Description
Flooding that leads to public inconveniences such as road closures, occurring when tides reach anywhere from 1.75 to 2 feet above the daily average high tide and start spilling onto streets or bubbling up from storm drains (NOS 2021; NOAA 2022).
Coastal flooding may occur during high tides, even without a strong storm or hurricane. The combination of sea-level rise, land subsidence, and the loss of natural barriers contributes to an increased frequency of flooding capable of closing roads and damaging property. High-tide flooding may also contribute to flooding away from the immediate coast when stormwater systems cannot drain, such as from a thunderstorm occurring during a high-tide event. The frequency of high-tide flooding along the coast has doubled over the past 30 years (NOS 2021).
High tides occur when the moon is in alignment with the sun, at either a new moon or a full moon phase. This causes slightly higher tides than at other days in the month. If ocean waters are particularly warm or there is a nearby storm system, this can add to high tide levels through thermal expansion or wind and pressure effects.
Historical Data
Sea Level Calculator
(Historical: Period of record varies by gauge, up to ~80 years; Future: Present-2100)National Oceanic and Atmospheric AdministrationThis tool includes historical and projected high tide flooding information for select coastal locations. Each station offers different “Quick Views” based on available data, so some stations have limited information. Components with an emphasis on historical information related to high tide flooding are below. Projection components are listed in the next section, Climate Change Trends.
Annual Changes in High Tide Flood Frequency
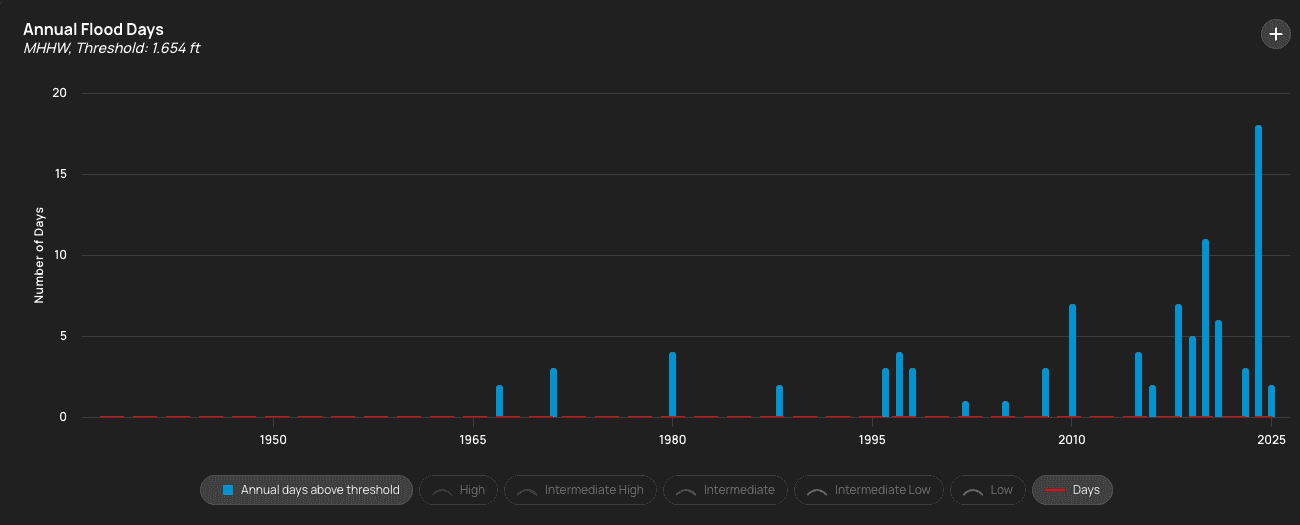
1. Click Get Started. 2. Zoom in on the map to the desired location and click a station. Note: The brighter blue station icons have all five Quick Views. Then, click the station pop-up box at the bottom of the map. 3. On the Quick Views page, click Changes in Flood Frequency. If this is not available, then the data are NOT available for this station – go back and select another station to continue. 4a. Change options in the Settings bar at the top of the page. Threshold allows you to select a pre-determined water level threshold or enter your own locally-relevant value. This value is used to identify a “flood day” for your location. Note: The small box NOS-Derived Thresholds under the graph shows the value for each NOS threshold. 4b. Days is the number of high tide flooding days that would impact your location. 5. The Annual Flood Days graph shows the number of days with high tide flooding, based on your selected Threshold. Hover your mouse over the blue bars to view annual values. The red dotted line shows the Days you selected. Read the text below the graph to learn more about the graph components. 4c. You can click graph components on the legend to toggle them on/off – ensure that only Annual days above threshold and Days are shown to better view the historical data. Note: Projection components are included in the instructions under the Climate Change Trends section. 6. The map shows the extent of water inundation under the selected water level Threshold. 8. A table of Average Historic Flooding Days per decade is further down the page. Note: Additional information for each section can be displayed by selecting the “+” icon in the corner of each graph, chart, or table.
Seasonal Variation
1. Click Get Started if you did not complete the above instructions, or click Quick Views at the top right of the page to switch Views. 2. Zoom in on the map to the desired location and click a station. Note: The brighter blue station icons have all five Quick Views. Then, click the station pop-up box at the bottom of the map. 3. On the Quick Views page, click Seasonal Variation. If this is not available, then the data are NOT available for this station – go back and select another station to continue. 4. Change options in the Settings bar at the top of the page. Threshold allows you to select a pre-determined water level threshold or enter your own locally-relevant value. This value is used to identify a “flood day” for your location. 5. The Average Flood Days by Month graph shows the relationship between monthly high tide flooding (blue bars) and the seasonal cycle of sea level heights (orange curvy line). Hover your mouse over the graph to view monthly values. Read the text below the graph to learn more about the graph components. 6. The map shows the extent of water inundation under the selected water level threshold. 7. A table on the bottom left displays the Top 10 Events by Month for your selected datum, showing past extreme water levels. 8. To the right of this, you can view the Month with Most Flood Days and the Month(s) with Highest Average Sea Level. 9. The graph on the bottom right displays the Seasonal Variation of Extreme Water Level Probabilities, showing the monthly likelihood of water levels reaching or exceeding the water level height determined by your selected datum for four exceedance probabilities. Hover your mouse over the graph to display monthly values for all probabilities/percentiles. Note: Additional information for each section can be displayed by selecting the “+” icon in the corner of each graph, chart, or table.
Coastal Flood Exposure Mapper
National Oceanic and Atmospheric AdministrationThis interactive mapping tool shows areas susceptible to high tide flooding, water depth from sea level rise, storm surge from different hurricane categories, and FEMA flood zones. Users can overlay societal, infrastructure, and ecosystem exposures.
1. Click Get Started. 2. Zoom in to the area of interest. 3. Click the layers icon in the bottom-left corner to change the map. 4. To view areas susceptible to high tide flooding, click the High Tide Flooding option under Hazard Layers. 5. Click any of the exposure layers, such as Critical Facilities, to add additional information to the map.

Gulf Tree
(Time frame varies by product) Northern Gulf of Mexico Sentinel Site Cooperative, Gulf of Mexico Climate Resilience Community of Practice, & Gulf of Mexico Alliance Resilience TeamThis decision support site guides users to the high tide/nuisance flooding tools and resources they need along the Gulf Coast through several filters of information, including how much time and effort they are willing to spend on the tool.
1. Choose a Filtered Search to look through all filter categories on one page or choose Guide My Search to walk through questions step by step to achieve what you’re looking for. 2a. If you chose the Filtered Search, first navigate to Geographic Scope. Click the Louisiana drop-down menu and choose Shoreline to select all coastal parishes or choose specific one(s). 2b. Under Tool Function, select what you’d like to use high tide flooding information for. You can leave this blank if you’re unsure which to choose. 2c. Under Cost, choose Free. 2d. Under Level of Effort, choose from low, moderate, or high (will determine how advanced the tool is). 2e. Under Climate Change Topics, select the drop-down for Flooding, then check the box for Nuisance Flooding. Explore other drop-down menus in this section to add more filters for additional topics. 2f. Click View Tool Matches on the top right to go to the results page. Click any of the tools or resources to go to that site.
3a. If you chose Guide My Search, Gulf Tree will walk you through the same filters by asking 6 questions. For step 1 (Tool Function), check the box for why you need a high tide flooding tool, then click Submit. If you’re not sure which option to use, you can Skip this step. 3b. Step 2 (Topic Area) includes a filter for what aspect of the topic you’re interested in. Click the drop-down menu for Flooding and check the box for Nuisance Flooding, then click Submit. 3c. On Step 3 (Location), click the Louisiana drop-down menu, then choose Shoreline to select all coastal parishes or choose specific one(s). Then, click Submit. 3d. For Step 4 (Level of Effort), choose how much effort you’d like to put into the tool, which will determine how advanced the tool is. Then, click Submit. 3e. For Step 5 (Tool Cost), choose Free, then click Submit. 3f. Click Leave Guided Search and View Matches to go to the results page or go back to a previous page on the left menu to change your selected options. Click any of the tools or resources to go to that site. 6. To create a new search, click Reset All Filters at the top right of the results page.

Climate Change Trends
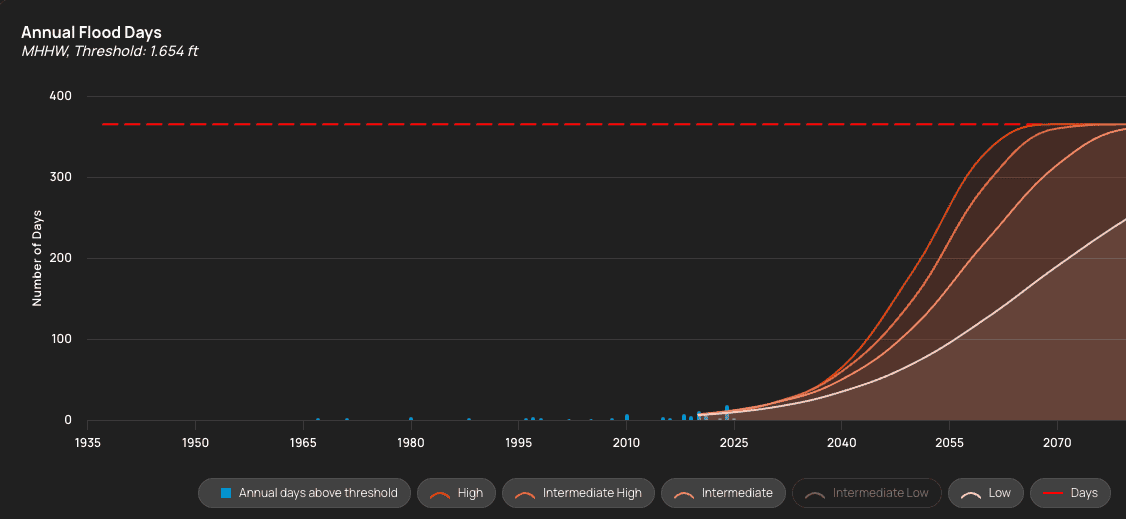
As sea levels rise and land sinks in Louisiana, coastal flooding is expected to increase by causing more frequent high tide flooding events that reach further inland (Sweet et al. 2022). The 2022 NOAA Sea Level Rise Technical Report (Sweet et al. 2022) determined high tide flooding from the mean higher high water (MHHW), which is the average height of the highest tide recorded at a tide station each day during the recording period. By 2050, minor/disruptive high tide events (1.6 ft above MHHW) are projected to occur more than twice as often than in 2020, and major/often destructive events (3.9 ft above MHHW) may occur 5 times more often along the western Gulf Coast (Sweet et al. 2022). This equates to as many as 200 high tide flooding days by 2050 under an intermediate sea level scenario and nearly every day of the year by 2070-2080 across the Louisiana coast (NOAA 2026). The U.S. coasts are experiencing a flood regime shift, in which high tide flooding events have increased, and only 1-2 feet of sea level rise will transition more “nuisance” flooding events to more moderate to major flooding events. Read more about future high tide flooding in Climate Change Science and Projections Resources.
Climate Explorer – High-Tide Flooding Tool
(1950-2099) NOAA Climate Program Office and National Environmental Modeling and Analysis CenterThe Climate Explorer is an interactive tool that provides the annual number of days with high-tide flooding for the historical period (up to 1950-present) and modeled projections (present-2099) under a lower and higher emissions scenario.
1. Type in the city or parish you are interested in. Click High-Tide Flooding. 3. Click a station (blue dot) on the map. Note: there is only one station available in Louisiana, near Grand Isle. 4. The resulting graph shows the annual days with high-tide flooding. The gray bars represent historical observations and the curves from the present year through 2099 represent the modeled/projected values, where red displays the higher emissions scenario and blue shows the lower emissions scenario. 5. Hover your mouse over the graph to view the observed or projected values.

Sea Level Calculator
(Historical: Period of record varies by gauge, up to ~80 years; Future: Present-2100)National Oceanic and Atmospheric AdministrationThis tool includes historical and projected high tide flooding information for select coastal locations. Each station offers different “Quick Views” based on available data, so some stations have limited information. Components with an emphasis on projected information related to high tide flooding are below. Historical components are listed in the above section, Historical Data.
Annual Changes in High Tide Flood Frequency
1. Click Get Started. 2. Zoom in on the map to the desired location and click a station. Note: The brighter blue station icons have all five Quick Views. Then, click the station pop-up box at the bottom of the map. 3. On the Quick Views page, click Changes in Flood Frequency. If this is not available, then the data are NOT available for this station – go back and select another station to continue. 4a. Change options in the Settings bar at the top of the page. Threshold allows you to select a pre-determined water level threshold or enter your own locally-relevant value. This value is used to identify a “flood day” for your location. Note: The small box NOS-Derived Thresholds under the graph shows the value for each NOS threshold. 4b. Days is the number of high tide flooding days that would impact your location. 5. The Annual Flood Days graph shows the number of days with high tide flooding, based on your selected Threshold. To view projected high tide flooding days, toggle on each scenario of interest by clicking the buttons on the legend under the graph (e.g., high, intermediate, low). Hover your mouse over the graph to view annual historical values and decadal projected values. The red dotted line shows the Days you selected. Read the text below the graph to learn more about the graph components. Note: Historical components are included in the instructions under the Historical Data section. 6. The map shows the extent of water inundation under the selected water level threshold. 8. A chart of Projected High Tide Flooding Days per decade and sea level rise scenario is below. 9. At the bottom of the page, a graph of Likely High Tide Flooding 2030 to 2050 is displayed for Intermediate and Intermediate High sea level rise scenarios. Hover your mouse over the graph to view decadal values for each scenario. Note: Additional information for each section can be displayed by selecting the “+” icon in the corner of each graph, chart, or table.